
Student Registration for the 2026 IPEIA Conference & Exhibition
Please follow the steps below to complete your registration.
| STEP 1 | Log into or create an account in IPEIA’s Registration system by visiting https://registration.ipeia.com. If you have forgotten your password, you may select Forgot Password to send yourself a password rest PIN. For further support, please contact admin@ipeia.com. |
| STEP 2 |
Under IPEIA Registration, select Registration Form. 
Select No, continue to form. 
|
| STEP 3 |
Under Registration, select IPEIA Student Membership & Conference. 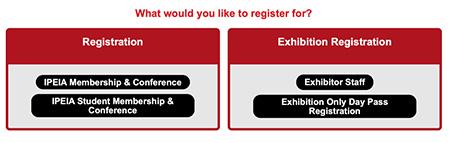
|
| STEP 4 |
Complete the required fields in the Student Questionnaire if the form appears, then select Continue. Note: The questionnaire only needs to be filled out once per year, so it won’t appear if you’ve already submitted it for the current year. 
If you meet the requirements, you will be prompted to continue your registration by selecting Student Registration. 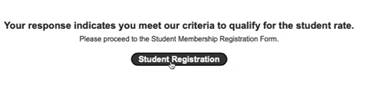
|
| STEP 5 |
Select the Conference Registration you wish to purchase then select Continue to proceed. E.g., if you want to purchase a Full Conference Student Access pass, select the one of the two options below (with or without lunch). 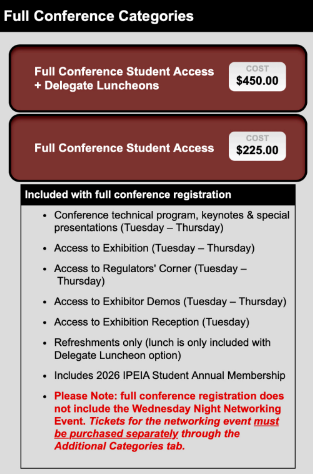
E.g., if you want to purchase a One Day Student Access pass, select one of the options below (Tuesday, with or without lunch; Wednesday, with or without lunch; or Thursday, with or without lunch). 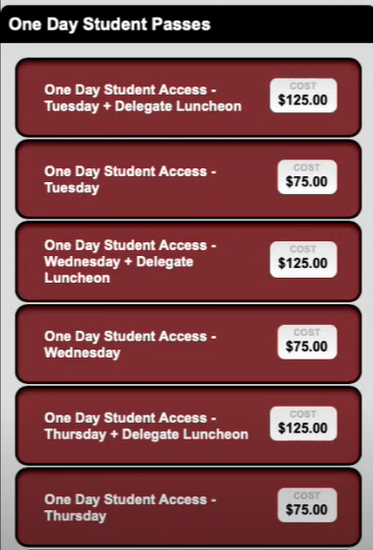
Important Note: If you wish to purchase two One Day Student Access passes, these registrations will need to be completed separately. Full Conference Student Access Registrations come with a complimentary IPEIA Student Membership. Select Continue to close the notice. 
|
| STEP 6 |
When you have finished selecting your conference registration, select Continue at the bottom of the page. 
|
| STEP 7 |
If you wish to purchase a networking ticket, enter the quantity of tickets you wish to purchase in the box beside Enter quantity. Select Continue when you have entered a number or if you wish to skip this step. Important Note: Networking Event tickets can be purchased later on, but availability is subject to change and cannot be guaranteed. 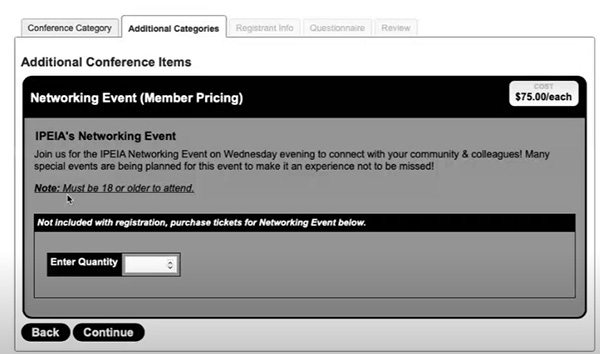
|
| STEP 8 |
Complete all required fields under Registrant info then select Continue.
Complete the questionnaire then select Continue.
Review the notices and agreements then select the box beside each of them. Select Proceed to Payment. 
|
| STEP 9 |
Review the details of your invoice and ensure the information is accurate, then select Proceed to Payment. 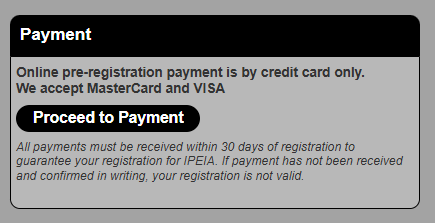
Important Note: Your registration is not secured until payment is made. |
| STEP 10 |
Complete the payment form the select Submit payment. 
|
| STEP 11 |
To complete your registration, you must submit your Student ID. Select Upload your Student ID. 
Carefully review the instructions before submitting your student ID. When ready, select Click to Upload a File and review the preview of your submission. 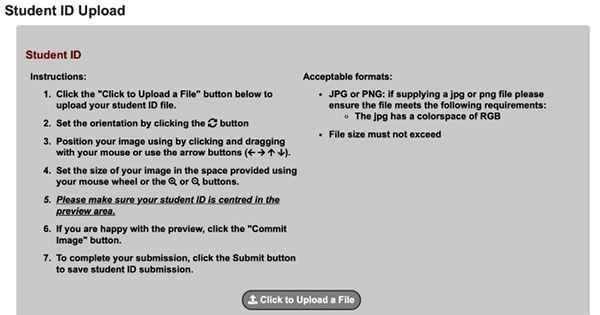
Select Commit Image when you have ensured the preview of your submission meets the criteria. 
Select Close. 
Select Submit. 
Your submission will be reviewed and you will be notified shortly on its acceptance or declination. Select Close. 
|